
Lenovo, a well-known name in the personal computer space, had a humble beginning as a small electronics vendor in China. Founded in 1984, the company gradually carved its niche in the PC market, offering consumer-grade desktops and laptops, along with servers for the business environment. Success for the company took a sharp turn for the better when Lenovo acquired IBM’s iconic ‘ThinkPad’ line-up. At that time, IBM was losing PC market share to rivals Intel and AMD and had to sell off its most-prized possession to keep the company afloat.
Today, Lenovo boasts of being the largest PC vendor in the world, besting competitors such as Dell and Hewlett-Packard. Such an achievement is a testament to its relentless pursuit of quality and innovation. And even though laptops, desktops, and server technologies remain the company’s core competencies, Lenovo has also ventured into smartphones and tablets via its recently acquired ‘Motorola’ brand. And in 2023, the company, for the first time, released its first portable PC handheld gaming device, known as the Legion GO.
Having said that, if you own a Lenovo device and simply want to check its warranty status in Singapore for repair or for an extension, then our comprehensive guide is what you need to achieve your objective.
Steps to Check Warranty Status
To check the warranty status of your Lenovo laptop, desktop, server, mobile, and smart devices, simply follow the below-mentioned steps judiciously.
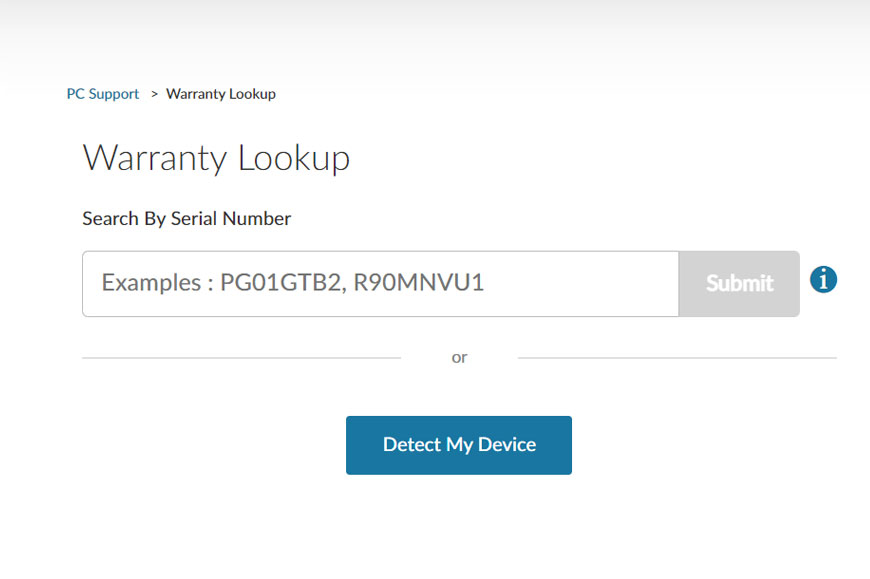
- The foremost step involves heading over to the official website here.
- On the landing page, you will be presented with the option to enter your device serial number.
- Proceed to enter the relevant serial number in the given space and hit ‘Submit’.
- The warranty status of your Lenovo laptop or any other device will be shown on your screen instantly.
Alternatively, you can also select the ‘Detect My Device’ option for the website to automatically detect your Levono device’s serial number via Lenovo Service Bridge. Simply follow the on-screen prompts, and you will be good to go.
How to Find Your Serial Number
There are various ways you can find the serial number manually that is associated with your Lenovo device. Steps for some of the popular processes have been provided below.
Finding Serial Number via Printed Label
- Start your journey by heading over to the official support page for finding serial numbers.
- On the landing page, click on the ‘Check Now’ option under ‘Using The Printed Label’.
- A new web page will open where you will need to select the sub-brand of your Lenovo laptop, desktop, or any other device. For instance, if you own a Lenovo ThinkPad laptop, then click on the ‘ThinkPad’ option.
- After that, directions for finding the serial number of your Lenovo laptop or device will be explained properly. Always remember that serial numbers are always printed on the side and/or back of your product, denoted by the ‘Serial Number’, ‘SN’, or ‘S/N’ moniker.
Finding Serial Number via Windows Command Prompt
- First, boot up your Lenovo laptop or any other device running Windows.
- Once booted up from the desktop, click on the search icon in the task bar (on Windows 8, 8.1, 10, and 11), which is notified by a small magnifying glass icon. In the search bar, type ‘Command Prompt’ and click on the first result that pops up.
- The Windows Command Prompt window will open, and in that window, type the following: wmic bios get serial number. After that, click on ‘Enter’.
- Once done, your Lenovo laptop’s serial number will be shown on the screen.
Please note that if you are running Windows 7, then you can type ‘Command Prompt’ by clicking on the glowing Windows button and then in the ‘Search Programs And Files’ box.
Finding Serial Number For Lenovo Tablets
If you have a Lenovo tablet that is running on Android and want to find its serial number, then you can do so by following the steps stated below.
- Begin by first booting your Android tablet.
- Once done, click on ‘Settings’.
- Under settings, click on ‘About Tablet > Status > Serial Number’.
- From there, you can simply copy or note down the serial number to check the device’s warranty status.
How to Get Official Support

For any reason you are unable to track your warranty status, then you can opt for official support by following the steps recommended below.
- Head over to the official phone support list web page here.
- First, select your device by clicking on ‘Change Product’. You can then choose to allow the website to automatically detect your product name, or you can browse through each product to select the correct one.
- Once your product or device is selected, the website will then showcase the support phone numbers that you can get in touch with.
- After that, proceed to call the given phone number(s) and explain your issue for a quick resolution.
If the steps above were not helpful, you can try directly calling 13536686 or 1300 557 073.