
Lenovo’s resurgence in the Australian market mirrors the company’s global journey from being a small Chinese startup to a worldwide technology giant. Even though Lenovo was officially founded in 1984, it was not until the early 2000s that the company entered the Australian PC market. One of the first strategic steps that the company took was to initially focus on selling computers from its recently acquired sub-brand, IBM.
As Lenovo gained more momentum in Australia, the company started selling its ‘ThinkPad’ laptops, shifting their focus to penetrating the market with their own products. Their expansion continued until the late 00s, opening offices in cities like Sydney and Melbourne and also becoming the number one PC vendor in the country. Further developments continued throughout the greater part of the 2010s, with Lenovo launching its ‘IdeaPad’ and ‘Yoga’ laptops for a more diverse product portfolio.
Today, Lenovo controls the Australian PC market with over 24 per cent market share, while also focusing on more innovation, research, and development. So, if you own a Lenovo laptop or any other computing device (desktops or tablets) that was purchased in Australia and want to check its warranty status, then our insightful guide can help you achieve that.
What are the Steps to Check Warranty Status
If you possess the serial number for your Lenovo laptop or any other device (such as desktops or tablets) and want to know the present warranty status for the same, then following the below-mentioned steps can prove to be helpful.
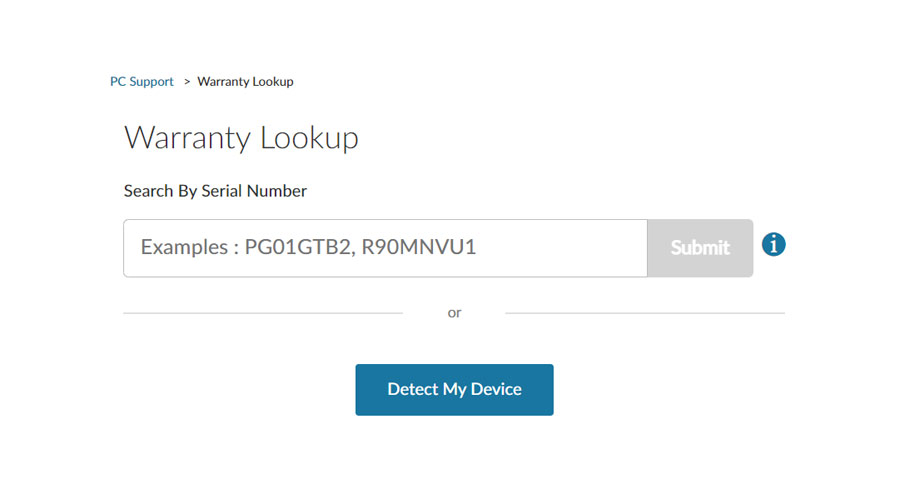
- Begin the process by heading over to the official website here.
- On the landing page, you will be asked to enter your device’s serial number.
- Once you have entered the requisite serial number, click on ‘Submit’.
- Finally, the warranty status of your device will be shown on your screen.
How to Find Your Serial Number
Lenovo deploys multiple ways to retrieve the serial number for your Lenovo laptop or any other Lenovo-branded device without facing any major hurdles. To know the steps for each process, be sure to go through the techniques stated below.
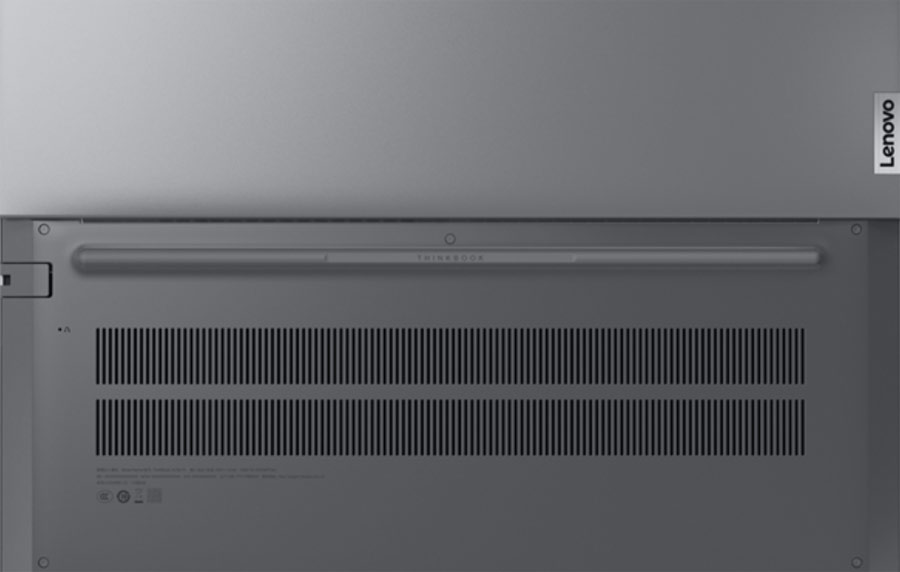
Finding Serial Number via Printed Label
- First, you need to head over to the official support page here.
- Proceed to click on ‘Check Now’ under ‘Using the Printed Label’, and you will be redirected to a new web page.
- In the next step, select the specific brand under which your laptop is sold. For instance, if you have a Lenovo Yoga laptop, then select ‘Yoga’. In the case of desktops and tablets, you can select the specific category, which is also stated on the same page.
- Once you have made your product selection, the website will let you know where you can find the printed label for your laptop. Utilize the instructions properly, and you can then use the serial number to find your device’s warranty status.
Finding Serial Number via Lenovo Service Bridge (LSB)
Lenovo Service Bridge is online as well as offline software that is required to detect the Lenovo product that you are using (works on the Windows operating system) automatically. Doing so will also reveal the device’s serial number simultaneously.
- The primary step involves heading over to the official support page here.
- On the landing page, click on ‘Detect My Product > Detect Device’ and a pop-up window will open. Accept the terms and conditions and privacy statement, and then click on ‘Continue’.
- LSB will attempt to detect your device over the internet via the web browser. If that proves to be unsuccessful, you will be asked to download the LSB executable file.
- Once downloaded, install the software and then launch it. You will then be able to retrieve your device’s serial number effortlessly.
Finding Serial Number via Windows Command Prompt
- Start by first booting up your Lenovo laptop, desktop, or any other device that is running on the Windows operating system.
- On Windows versions 8, 8.1, 10, and 11, click on the search button on the taskbar and then type in ‘Command Prompt’ (without quotes). After that, hit ‘Enter’. If you are running Windows version 7 on your system, then click on ‘Start > Search Programs And Files’ and type in the aforementioned command.
- The Windows Command Prompt window will open, and in that window, type the following command: wmic bios get serialnumber. After that, hit ‘Enter’.
- Once done, your Lenovo device’s serial number will be shown on your screen, which you can then use to know the warranty status.
How to Get Official Support
If you are unable to obtain the serial number for your Lenovo device, even after following the processes provided beforehand, then you can ask for official assistance through the essential steps listed below.
- Head over to the official ‘Contact Us’ page here.
- First, you need to click on ‘Change Product > Browse By Product’ and select your Lenovo laptop’s or any other device’s model.
- After selecting the specific model name, you will be provided with a list of contact options that you can choose from.
- Select your preferred process of communication and then connect with Lenovo Australia’s customer support for further assistance.
Alternatively, you can also dial 1-800-043-849 for any technical assistance with your Lenovo laptop or any other Lenovo-branded device. Phone lines are open from 9 AM to 6 PM (local time) between Monday and Friday.