Dell’s entry into the Asian market arrived in the late 1990s, which was also the period when the company set up shops in Indonesia. Back in those days, Dell exclusively focused on direct sales to businesses and government agencies, leaving the consumer segment in the dust. However, as the demand for personal computers started to rise, so did Dell’s strategy focus on the consumer segment.
By offering competitive pricing and a wide range of products, Dell helped computing devices be accessible to the country’s masses, leading to a resurgence in the PC market space. While the company may not hold a significant market share in the current fiscal year of 2025, it still continues to drive digital transformation among the tech-savvy Indonesians. Additionally, the company also supports economic growth for the country by creating employment and pushing overall growth of the IT sector.
If you are a proud owner of a Dell laptop in Indonesia – be it their top-of-the-line XPS laptops or their Alienware desktops – and are looking to check the device’s warranty status, then you can easily do so by following our comprehensive guide in its entirety.
Steps to Check Warranty Status
Dell uses ‘Service Tag’, abbreviated as ‘ST’ or ‘S/N’ to detect its products and verify their warranty. Similar to serial numbers, you can find your device’s service tag sticker on its side or bottom interface. The sticker will also contain the device’s ‘Express Service Code (EX)’ as well as the date of manufacturing.
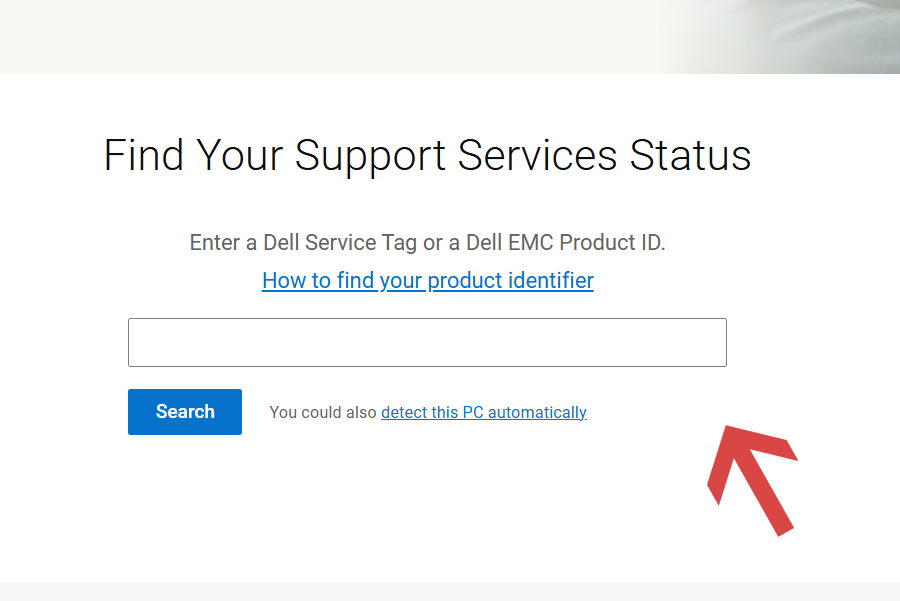
If you have the service tag number for your Dell laptop or desktop with you, then you can check its warranty status by following the necessary steps listed below.

- Start by first visiting the official support page for Dell Indonesia.
- On the landing page, you will be provided with the option to enter your device’s service tag number.
- Once you have entered the tag number, which is a combination of an alphanumeric code, click on ‘Search’.
- If the service tag number entered by you is a valid one, you will be able to recover your device’s warranty status right away.
How to Find Your Serial Number

As previously mentioned, Dell uses ‘Service Tag’, ‘Express Service Code’, or ‘Serial Number’, as product identifiers, to access product information such as the technical specifications of the device, warranty, and documentation. Where the service tag is a seven-digit alpha-numeric code, the express service code is a 10 or 11-digit numeric version of a service tag.
There are various ways through which you can find the service tag or serial number for your Dell laptop or desktop, apart from just consulting the printed label attached to your device. To explore the other options, be sure to go through the processes listed below.
Finding Serial Number Using Dell Support Assist App
- Begin your journey by first downloading the ‘Support Assist’ app on your Windows-based laptop or desktop. Ensure that you are running Windows 10 or later versions.
- Once downloaded, run the app and proceed to install it on your system.
- After that, launch the app, and you will be able to find the service tag code located on the top-right corner of the app.
Finding Serial Number Using Windows Command Prompt
If you are using a Dell laptop or desktop that is running on the Microsoft Windows operating system, you can find the device’s serial number by running a simple command.
- First, you need to boot up your device and then click on ‘Start’ from the home screen. After that, look for the ‘Command Prompt’ or ‘CMD’ option. Alternatively, you can use the ‘Search’ function on the home screen and type in ‘CMD’ in the search box to find the Windows Command Prompt option.
- Once you launch the Command Prompt app, a black pop-window will show up on your screen. To get the device’s service tag number, type in the following command: wmic bios get serialnumber, and hit ‘Enter’.
- On doing so, you will be able to view the serial number and use it for claiming your warranty.
If you are running the Linux operating system on your Dell device, then you need to follow the below-mentioned steps instead to get the necessary service tag number.
- Proceed to first open terminal by pressing the following keys together: CTRL + ALT + T. Ensure that you are signed in as a superuser or an administrator.
- After that, type in the following command: sudo dmidecode -s system-serial-number, and press ‘Enter’.
- The device’s serial number will be shown instantly on your screen.
Finding Serial Number Using BIOS
- The primary step involves booting up or restarting your Dell laptop or desktop.
- When the Dell splash screen appears, start pressing the ‘F2’ button on your keyboard multiple times, so that you can enter the system’s BIOS.
- In the BIOS, you will be able to find the service tag or serial number under the ‘System Information’ or ‘Overview’ section.
How to Get Official Support
For any further assistance regarding your Dell device’s warranty claims, you can get in touch with the company’s customer care department over the phone at 0062 2 1300 49399, 00604 607 2900, 007-803-601-5227, and 00604-6072215. Phone lines are available from Monday to Friday, between 9 AM and 6 PM.
Conversely, you can also look for a Dell carry-in service locator around you in Indonesia for any physical assistance.

