It was 1984 when Dell emerged as a computing enterprise from a humble dorm room at the University of Texas. However, even with its nascent roots, the company wasted no time in expanding to the other parts of the world, most notably Australia during the early 1990s, with the sheer hope of capitalizing on the growing demand for personal computers.
Back then, Dell’s direct-to-consumer approach proved to be a stellar business decision, as it allowed customers to opt for greater product customization, competitive pricing, and direct customer support – all of which resonated strongly with Australian consumers and businesses. Headquartered at the heart of Sydney, the company experienced significant growth during the late 1990s and 2000s, propelling the organization to become a leader in the country’s personal computing industry. Over time, Dell has also diversified its portfolio to include enterprise solutions, including servers, storage, and networking equipment.
If you have recently purchased or own a personal computer, be it a laptop or desktop, from Dell and want to know the various avenues through which you can check the device’s warranty status, then you can effortlessly do so by going through our comprehensive guide below.
Steps to Check Warranty Status

To check the warranty status for your Dell laptop or desktop computer, you need to have the device’s serial number (or product ID), abbreviated by the ‘ST’ or S/N’ tag. You can find the serial number for your device on the device’s box, user manual, or even on the device itself (usually at the bottom side for laptops and back side for desktops).
Once you obtain the serial number, follow the steps listed below to find its present warranty status.
- Begin your journey by first visiting the official website.
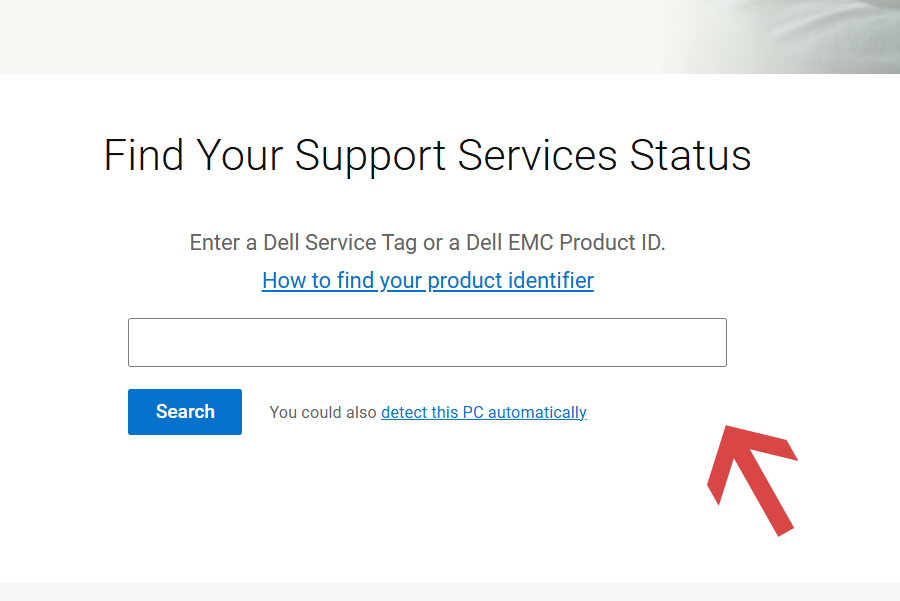
- On the landing page, you will be asked to enter the device’s serial number or service tag number. After entering the device ID, click on ‘Search’.
- The current warranty status for your device will be shown on your screen right away.
How to Find Your Serial Number

As previously mentioned, there are various ways through which you can obtain the serial number (S/N) or service tag (ST) for your Dell laptop or desktop. The company uses this serial number to access certain product information, such as the device’s technical specifications, documentation, and warranty.
Some of the nifty processes through which you can obtain your Dell device’s serial number or service tag number have been properly described as follows.
Finding Serial Number Using the BIOS Interface
- Start by first booting up your device (or restarting).
- During the boot-up process, when the Dell logo will appear, press the ‘F2’ key on your keyboard multiple times. On doing so, you will be able to access the BIOS section.
- Inside the BIOS interface, you will find the serial number or service tag number stated for your device, preferably under the ‘System Information’ or ‘System Overview’ section.
Finding Serial Number Using SupportAssist App
- If you are running a Microsoft Windows operating system-based Dell laptop or desktop, you need to first download the ‘SupportAssist’ app.
- Once downloaded, install the app on your device and then proceed to launch it.
- After launching the app, you will see your device’s serial number or service tag notified in the top-right area of the app.
Finding Serial Number Using the Command Line
- The primary step involves first booting up your Dell laptop or desktop.
- If you are running the Windows operating system, click on ‘Start’ and then search for ‘Command Prompt’ or ‘CMD’. Once you find it, launch it.
- In the CMD interface, type the following command: wmic bios get serialnumber, and then hit ‘Enter’. You will then be able to view your device’s serial number.
Please note that if you are running a Linux operating system on your Dell laptop or desktop, you need to follow a different process, as explained below.
- Kickstart by first opening the Linux Terminal by using the following keyboard shortcut: CTRL + ALT + T.
- After that, type in the following command: sudo dmidecode -s system-serial-number, and then hit ‘Enter’.
- Your device’s serial number or service tag number will be showcased on your screen.
Remember that to run the aforementioned command in Linux, you must log in as a superuser or administrator. And by doing so, you will need to enter the administrator password (when asked for).
How to Get Official Support
If you require any further assistance with your Dell device, then you can get in touch with the official customer care department in Australia at the following phone numbers: 1300-655-533, +612 9930 3489 (landline), and +612 9051 8089 (toll). Phone lines remain open from 8 AM to 8 PM, between Mondays and Fridays.
Alternatively, you can message the team via WhatsApp at +61437161451, which operates 24/7.

